A few weeks ago I shared a “random objects” craft where I turned empty chocolate egg containers into Easter bunny canisters. Today I have a duo of random objects to share, both of which I transformed into magnets. My idea behind these projects was to turn objects I might have just thrown away into something new and appealing.
Todays objects were especially random. The first was a duo of dimmer knobs that my mom and I bought as an attempt to find a temporary fix for a cracked dryer knob (it did not work).
The second duo of random objects was a My Little Pony Squishy Pops blind capsule that I bought to add to my collection of small toys. Having not known much about these Squishy Pops, I just assumed that each blind capsule featured an actual pony, but alas, I was very wrong and opened the capsule to find two very lame and identical pee-yellow beads (I was very grumpy after opening them and refuse to buy one every again!).
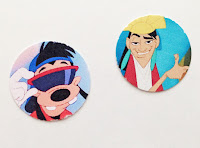
While these items were not overly expensive, I figured instead of wasting about $5 on these silly things, I turned them into magnets. For the dimmer knobs I changed them into sparkly magnets featuring two of my favorite Disney characters (Max Goof and the Emperor himself, Kuzco) and the Squishy Pop beads became mini sprinkled donut magnets. Here is how I did it!
The magnets I used- they were VERY strong and almost caused a few accidents when painting!
Dimmer Knobs to Sparkly Disney Magnets:
1. I began by painting one of the knobs with a pink acrylic paint and the other knob with a brown acrylic paint. I did about three coats to really cover the plastic well. I did not paint the back/inside of the knobs, since they would not be seen when used.
2. After the paint was dry, I added a glitter top coat. This added a bit more style over the flat paint, but also helped seal in the paint and provide a shiny coating. For the pink one I used a multicolored glitter coat, and the brown had a gold glitter coat. I did two coats to get extra sparkle.
4. After attaching the magnet and allowing time to fully dry, I printed the images I wanted to use on the top of the knob. For the pink, I chose an image of Max Goof from A Goofy Movie. For the Brown, I went with a photo of Kuzco from The Emperor’s New Groove. I printed them on white card stock and used a 1” circle punch to cut them out.
5. To attach the images, I brushed tacky glue onto the back and carefully pressed it onto the knob. Since the knob was a bit rounded, I had to press around for a while to fully secure. I then brushed a layer of Mod Podge over the top the seal the image in and prevent it from future damage.
6. To finish off the magnet, I glued a few pieces of sequins and a gem to add a bit more style and texture. I think these turned out better than I anticipated and I am happy to represent a few of my favorite characters that are harder to find on items.
Squishy Pop Beads to Mini Donut Magnets:
1. To start the project, I took a tan acrylic paint and brushed three coats onto each bead, drying in between each coat. This created the “donut” dough color.
2. After everything was dry, I took a matte Mod Podge and brushed two coats on top. This again helped seal in the paint and added a better finish.
3. I then used the same pink and brown colors from the previous magnets to create a “strawberry” and “chocolate” frosting. I painted a wavy circle around the top to create the idea of frosting over the top.
4. On top of frosting, I then brushed a coat of glossy Mod Podge over, to create the look of shiny, glistening frosting.
5. When the Mod Podge was dry, I then carefully added a selection of small beads on top of the “frosting”. To do this I squeezed out acrylic glue onto some tin foil and then used a toothpick to put the glue on the back of the bead.
6. With the glue on the beads totally dry, I added one more layer of glossy Mod Podge on top to secure them (I figured it would be better to be safe than worry about the beads falling off!).
7. The donut was now completed, but I had to come up with something to put the piece on. I found a bag of tiny plates and silverware in the doll house section at Hobby Lobby, which was the perfect size. I superglued a magnet onto the back of two plates, and then used acrylic glue to attach the donut to the plate. I finished the magnet up by gluing a tiny fork onto the side of the plate. It looked very cute and yummy!


No comments:
Post a Comment